| Back to Main Page |
A quick an easy way to get up and running with a layout template that has a real polished, professional appearance is to make use of the autoformatting capabilities of Microsoft Word.
This powerful functionality is used by power users to apply several different styles elements quickly and efficiently. The styles that are applied deliver colors and border that look well together and allow for easy switching to another scheme is you change your mind. You can test any number of styles and see how your data looks when the style is applied, and continue until you find the one that meets your needs.
When applied, the styles make formatting changes to five different items in a table:
Even nicer is the fact that you can pick and choose the components to apply. If you are satisfied with the
font face and have already devoted some effort into getting the column widths to your liking, you can opt
to apply only the color. shading, and border elements of the style.
More advanced options within styles allow you to apply different formats to first and/or last rows and/or columns. If you have a row that contains labels or a column full of totals, this is your ticket to an easy one click change that will be retained when BI Publisher merges the data and layout template.
By now, you're probably thinking, "Enough with the sales pitch! Just show me how it works!" OK. I will...
To begin, Let me show you layout template I am using. if you're wondering, the template is based on a query of the emp table from the Vision sample database, but the data is not really important in this example. This lesson is focused only layout presentation.

To get started, click anywhere in the table that you want to format. You can select a single cell, some text in one of the cells, or the entire table -- it doesn't matter as long as you have made some portion of the table active. Then choose Table | Table AutoFormat. If that item is not selectable (greyed out), it means that no portion of the table has been selected.
Once you do that, the following dialog box will open:
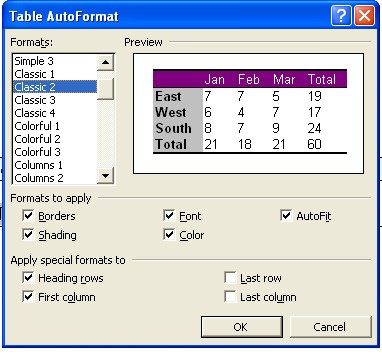
The format themes available for you to choose are listed in the box on the left side. As you highlight each one, you can watch the preview window to get an idea of what the style will when applied to your table. The table in the preview window is elegantly simple in that it contains row and column headers and footers along with a couple of rows and columns of data cells. how
By default, special formats are applied to the header row and column, but not to the footer row and column. You can change that by checking the boxes in the "Apply special formats to" section.
You also can pick and choose from among the components of the format style. For example, if you decide that you like the colors, but would rather not use the Arial font that the style uses, then check or uncheck the boxes in the "Formats to apply" section accordingly. Click some of the themes available, and see the wide variety of theme available! Then, experiment with piecemeal application of the components of the theme that most interest you!

This is how the table in my layout template looked after I applied the autoformat to the table shown above. I chose not to apply sepcial formats to the first column, since my table contains regular data in that column. I opted only for the special row header.
Back to Main Page
Page Created on Monday, January 7, 2008.
Last updated
by Daniel Stober
(c) 2008 All rights reserved.