| Back to Main Page |
A common request in many report specs is to repeat header rows at the top of each page. The easiest way to do this in a layout template is to make use of the functionality delivered within Microsoft Word. However, that application allows you repeat only the first row in the table. What if your header contains two rows? I'll address that today.

Let's start with a quick look at how to use the repeating rows functionality. With the table selected choose "Table Properties". That function is available from the right-click context when you have the table selected, or you can use the "Table" menu on the Standard Menu Bar. Either way, the properties sheet opens with the "Table" tab selected.
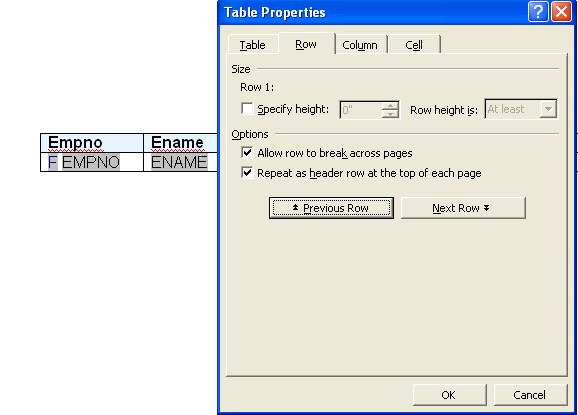
To specify repeating rows, you'll need to select the "Row" tab. EVen after all of this, you're still not quite where you need to be. The properties sheet allows you to make changes to all rows in the table to individual rows. You have to read carefully to make sure that you are changing properties for the correct one. The properties sheet on the "Row" tab is divided into two sections, "Size" and "Options". The first line under "Size" tells you which row or rows are currently active. The two buttons in the "Options" section navigate through the rows.
If "Row 1" is not the active row, use the "Previous Row" or "Next Row" buttons as necessary to get to Row 1. When you do, the properties sheet should look like the one displayed at right.
Then, to make row 1 repeat, check the box in the "Options" section labeled "Repeat as header row at the top of each page." It's that simple!
But all of that explanation was just a set-up to the real purpose of this lesson: What if you want to repeat more than just Row 1 at the top of each page? You may not have noticed, but as you scrolled through the rows using the "Previous" and "Next" buttons, the option to repeat as header row was greyed out (unselectable) on all rows except Row 1. So if we need to repeat more than one row, we have to be a little more creative.
To demonstrate the solutions to this limitation, I am developing a report wherein the information presented is just a little too much to squeeze into a single row. But, rather than finesse the data and column widths, I've decided to allow each record of data to be presented over two rows in the table. Of course, once I do that, it will mean that I have to have two rows of column headers, too!
The easiest way for me to accomplish this is to be smart about the way that I create the additional header row. If I start with a table that I have already set the properties to repeat the first row, as demonstrated above. As one of the steps in converting the table to double rows for each record, I'll need to insert a couple of rows into the table. To insert rows, Microsoft Word allows me to specify where I want the new rows inserted, relative to the currently selected row in the table. I can choose whether I want to insert my new rows above or below the current row. The interesting thing about this is that the newly inserted row will inherit the properties of the active row.
So, is you want a second repeating row, the trick is to make sure that the new row you insert inherits the properties of the repeating row at the top, rather than the data row in the second position. Select the top row, and then, from the Standard Menu Bar, choose, Table | Insert | Rows Below. (It is possible to insert a row using the right-click context menu, too, but only if the entire row is selected first. If you know how to do that, great. But, if not, do not fret, the menu bar method is very easy.)
Once you insert a row, check the table properties, and navigate to the second row using the technique described above. Notice that the "repeat row headers" property is checked, but unselecteable. You have successfully added an additional repeating row, but you will not be able to change your mind and decide not to have it repeat. The only option in those circumstances will be to delete the row.
The second approach is to embed the table in the header of the document. This technique is fraught with its own set of difficulties, but I have used it in a production report. The problem that can be encounted with this method is that the table in the header is a separate table from the table in the document, which means that field column widths may not be in synch in your output. As far as Microsoft Word is concerned, there are two completely different tables in the document.
In normal layout template development practice, you develop a single table with a header row and data rows. In that table, the column widths vary in unison. If the report contains a field where one record is usually wide, the default action is that the column grows wider to accommodate the data. When the data field widens, the column header grows along with it. But, when you use another table, that association no longer exists: if a column in the data grows wider, the corresponding column in the header probably will not expand along with it.